ServiceNow Integration Guide
This guide provides information about integrating Genian NAC with the ServiceNow CMDB.
Guide Overview
This guide explains how to configure the integration between Genian NAC and ServiceNow using the Service Graph Connector for Genians and how to verify the integration results.
The integration uses the Genian NAC REST API to synchronize node information collected by NAC, such as IP addresses, MAC addresses, and operational status, with the ServiceNow CMDB (database).
Supported Versions
Product |
Version |
Notes |
|---|---|---|
Service Graph Connector for Genians |
1.0.16 (Beta) |
ServiceNow Store app |
Genian NAC |
V5.0 Enterprise Edition |
On-premises / Cloud, with API Key issuance available |
ServiceNow |
Zurich |
Plugins and licenses required (see Prerequisites) |
Integration Architecture and Purpose
Service Graph Connector for Genians (hereafter referred to as SGC for Genians) registers node information collected by Genian NAC as CIs in the ServiceNow CMDB.
CMDB (Configuration Management Database): A central database that manages configuration information for an IT environment
CI (Configuration Item): An individual configuration item managed in the CMDB
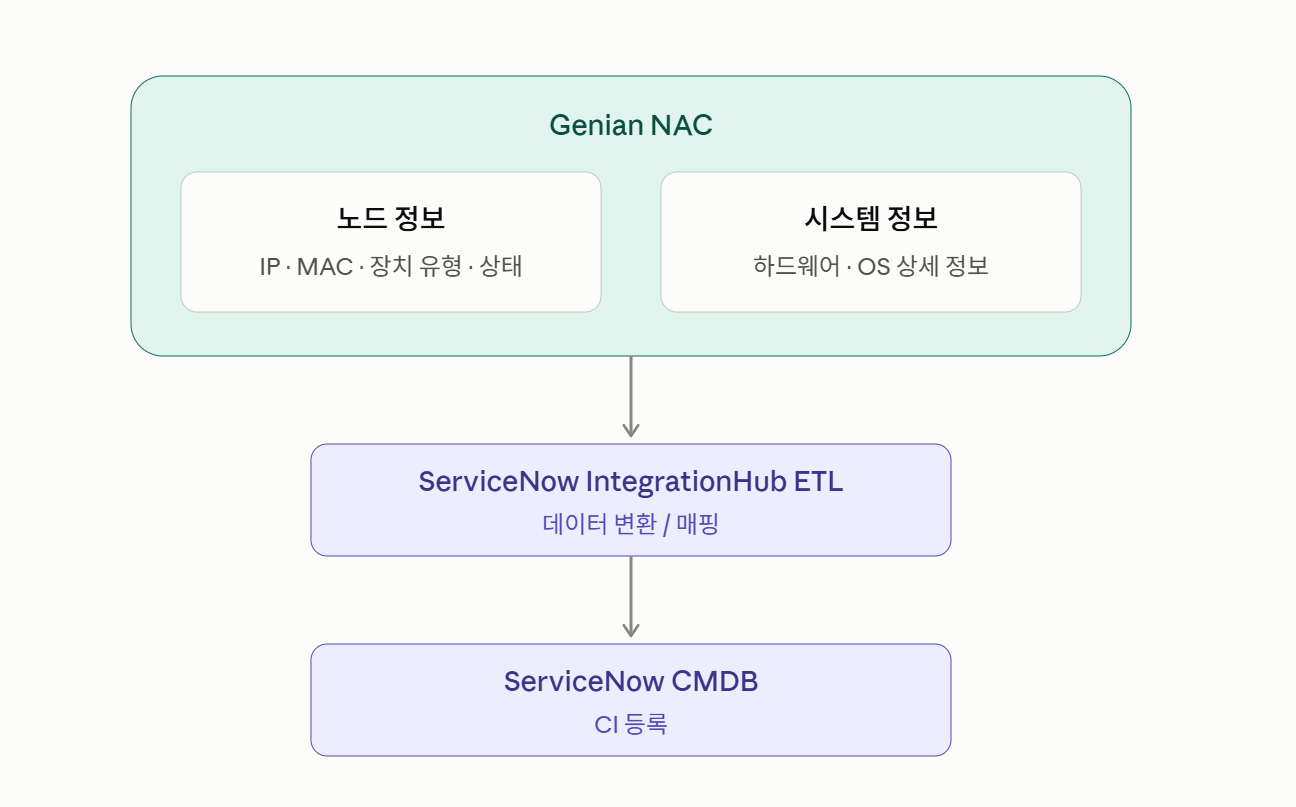
Integration architecture
Register Network-Wide Assets in the CMDB
Nodes discovered by Genian NAC can be registered in the CMDB without requiring credentials for each device, allowing unmanaged endpoints, IoT devices, and personal devices to be managed as assets.
Automatically Update CMDB Asset Information
Asset information collected by NAC is automatically registered or updated in the CMDB according to a schedule, reducing manual work.
Supplement Existing CMDB Data
Devices not already in the CMDB are registered as new CIs, while missing fields for existing devices are populated using information collected by NAC.
Integration Data
Synchronized Fields
Category |
Fields |
|---|---|
Basic Information |
Device ID, device name, IP address, MAC address, operational status, platform |
OS Information |
OS name, OS version, domain |
Hardware Information |
CPU name, CPU manufacturer, CPU speed, memory, disk capacity |
Network Adapter Information |
Network interface name, SSID, network card manufacturer |
Note
Hardware information is synchronized only for PC and server endpoints on which the agent is installed and system information has been collected.
CMDB Registration Structure
Each node is registered as interconnected CIs according to ServiceNow's Identification and Reconciliation Engine (IRE) rules.
CI |
Description |
|---|---|
Device CI |
Device information (manufacturer, class, operational status, OS and hardware information, etc.) |
Network Adapter CI |
Linked to the device CI based on the MAC address |
IP Address CI |
Linked to the device CI based on the IP address |
Nodes with the same device ID are managed under a single device CI, which is created using information from the representative node (NL_NODEID = DL_ACTIVENID).
The remaining nodes are created only as network adapter CIs and IP address CIs and linked to the device CI.
If no representative node exists, a Hardware Stub CI may be created for linking purposes.
CI names follow the format "Device Name [First 8 Characters of Device ID]". If the device name is unavailable, the FQDN, platform name, IP address, MAC address, and device ID are used as fallbacks, in that order.
Prerequisites
ServiceNow Plugins and Licensing
Category |
Item |
|---|---|
Plugin Request |
ITOM Licensing |
Plugin Request |
ServiceNow IntegrationHub Enterprise Pack Installer |
Plugin Request |
ServiceNow IntegrationHub Action Template – Data Stream |
Store Installation |
Integration Commons for CMDB |
License |
ITOM Discovery License |
Note
Required plugins and licensing may vary depending on the customer's ServiceNow environment. Verify the requirements in advance.
Installation and configuration must be performed using an account with ServiceNow administrator (admin) privileges.
Network Configuration
Because ServiceNow is a cloud service, a ServiceNow MID Server (an intermediary server on the internal network) is required to communicate with an on-premises Policy Server.
Deployment Type |
Policy Server URL |
Notes |
|---|---|---|
On-premises |
|
TCP/8443 connectivity from the MID Server to the Policy Server is required |
Cloud |
|
(Optional) Configure the ServiceNow Interface in Korean
The default language of ServiceNow is English. To use the Korean interface, a ServiceNow administrator must activate the Korean language plugin.
Navigate to All > System Applications > All Available Applications > All.
Search for the I18N : Korean Translations plugin.
Click Install, then click Activate.
Change the display language.
Per-user setting: Select Korean under User Menu > Preferences > Language & Region.
System-wide default language: Set the system property
glide.sys.languagetoko.
Note
Product and application names (such as Service Graph Connector for Genians) remain in English even when the Korean interface is enabled.
Genian NAC Configuration for Integration
Step 1: Generate an API Key
In the top panel, navigate to Management > Users.
In the left panel, select Full Administrators.
Click the Administrator Name for which you want to generate an API Key.
Under Login Settings > API Key, click Generate New Key and copy the key.
Click Update.
Note
An API Key is displayed only once when it is generated. You must click Update to apply the key.
API Keys are generated for individual administrators, and each key can retrieve information only within the permissions assigned to its administrator.
ServiceNow Configuration for Integration (5 Steps)
ServiceNow menus and buttons are shown using their English interface labels. If you use the Korean interface, some menus and buttons may appear in Korean. (See "Configure the ServiceNow Interface in Korean" under Prerequisites.)
Step 1: Install the Connector
On the Service Graph Connector for Genians page in the ServiceNow Store, click Get App to install it.
Step 2: Start the Setup Wizard
Change the Application Scope at the top of the screen to Service Graph Connector for Genians.
Select Service Graph Connectors > Genians > Setup and click Get Started.
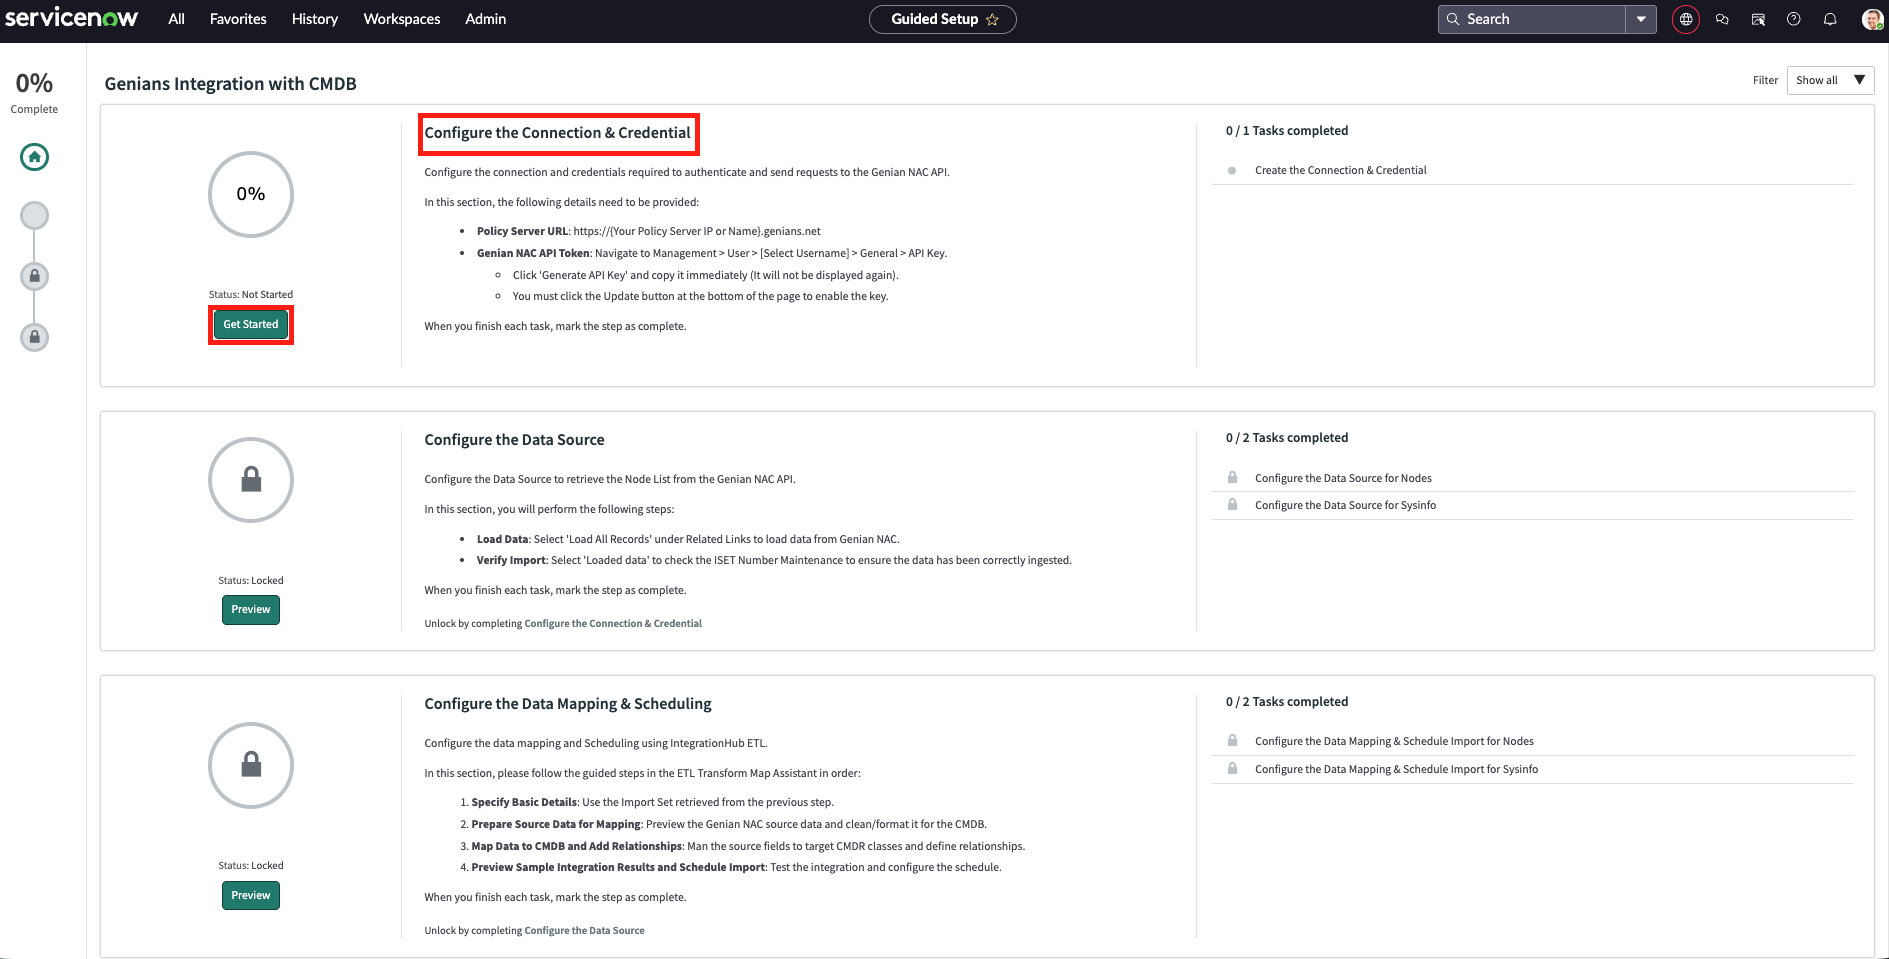
Step 2: Service Graph Connectors > Genians > Setup screen
Step 3: Configure Connection and Credentials
Click Configure under Configure the Connection & Credential > Create the Connection & Credential.
Click Create New Connection & Credential in the related links section at the bottom, enter the following information, and click Create.
Setting
Value
Connection Name
Any name (e.g., Genian NAC Integration)
Connection URL
Policy Server URL (see Network Configuration)
API Key
API Key generated in NAC
(On-premises) In the newly created connection, select Use MID server, choose the MID Server to use, and click Update.
Enter the API Key under Configure the Genian NAC API Key and click Update.
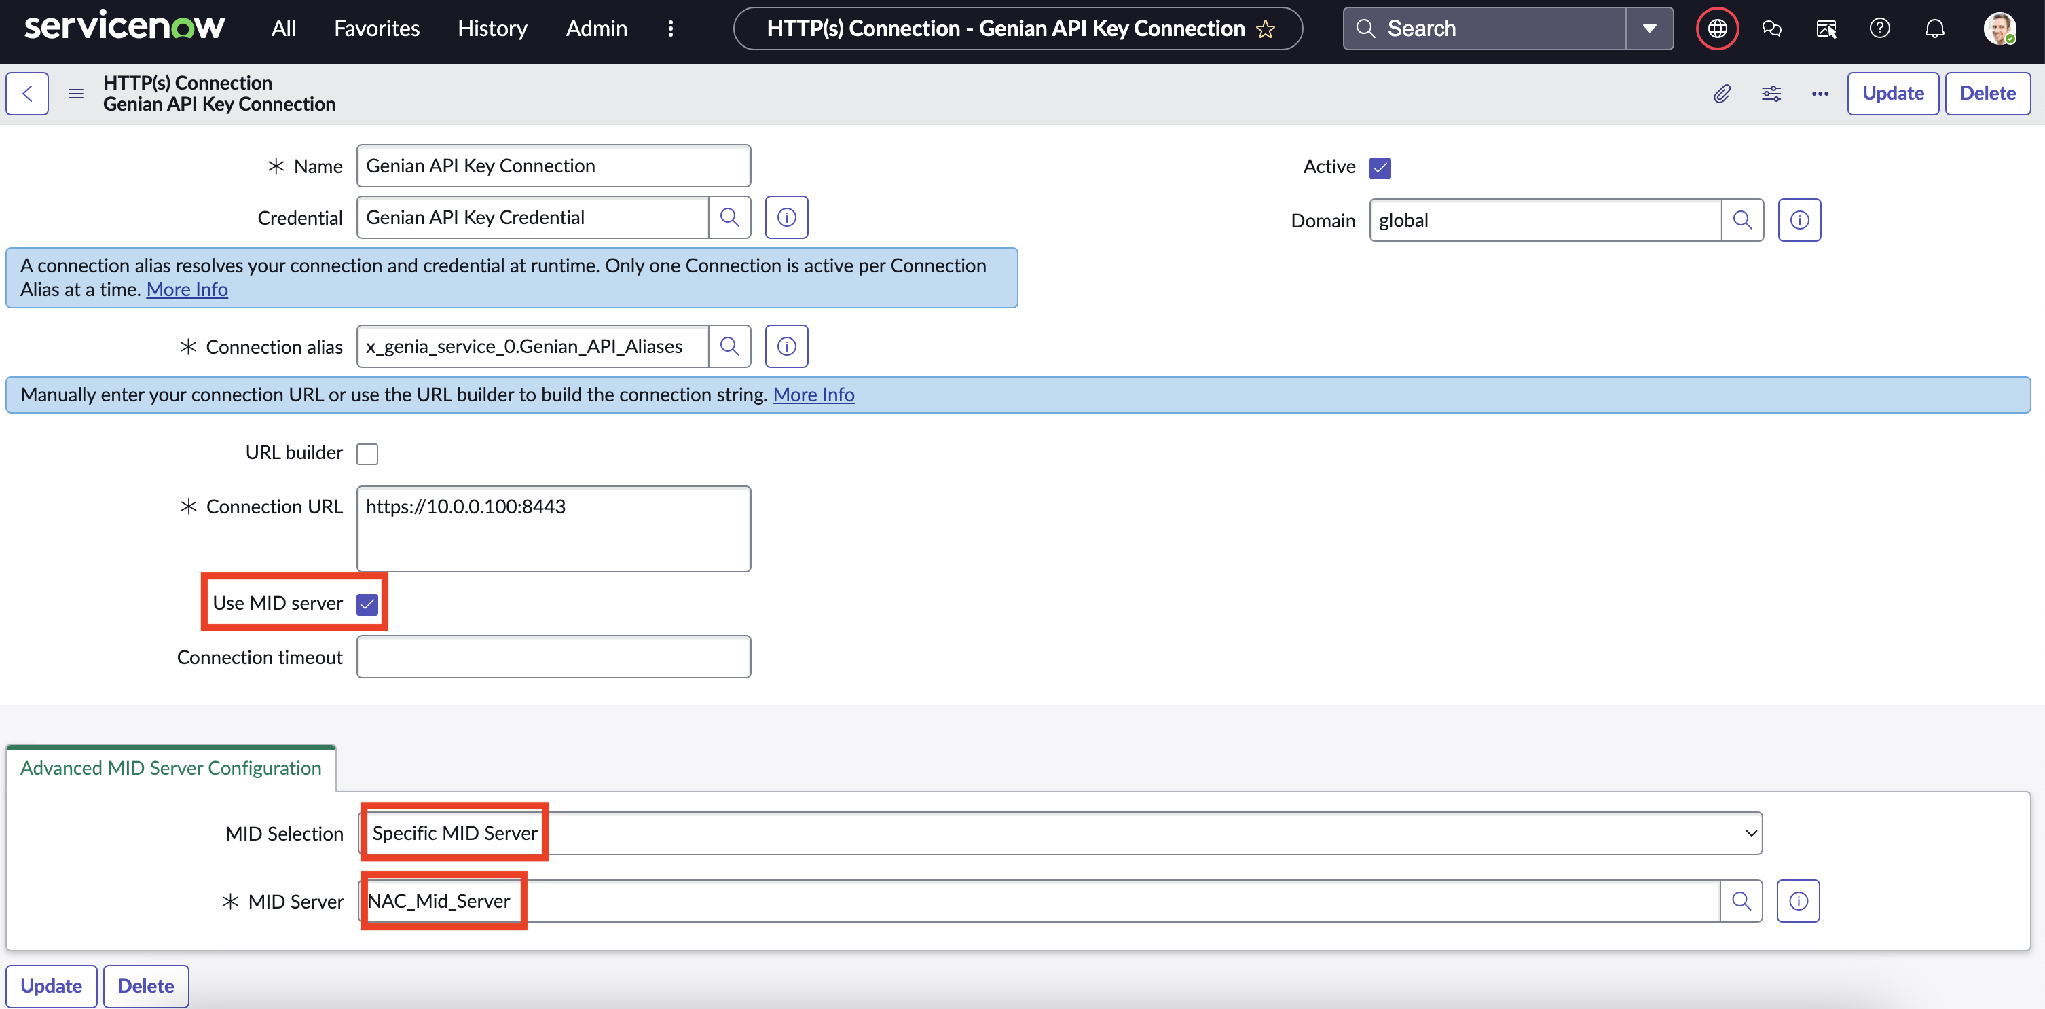
Steps 3 and 4: Enable Use MID server and configure the MID Server
Step 4: Configure Data Sources
Click Configure under Configure the Data Source > Configure the Data source for Nodes.
Click Load All Records in the related links section at the bottom and verify that the data has loaded successfully under Loaded data.
Repeat the same process under Configure the Data source for Sysinfo (system information).
Step 5: Configure Data Mapping and Scheduling
Click Configure under Configure the Data Mapping & Scheduling > Configure the Data Mapping and Schedule Import for Nodes.
In the ETL Transform Map Assistant, complete the following steps in order. Click Mark as Complete at each step even if no changes are needed.
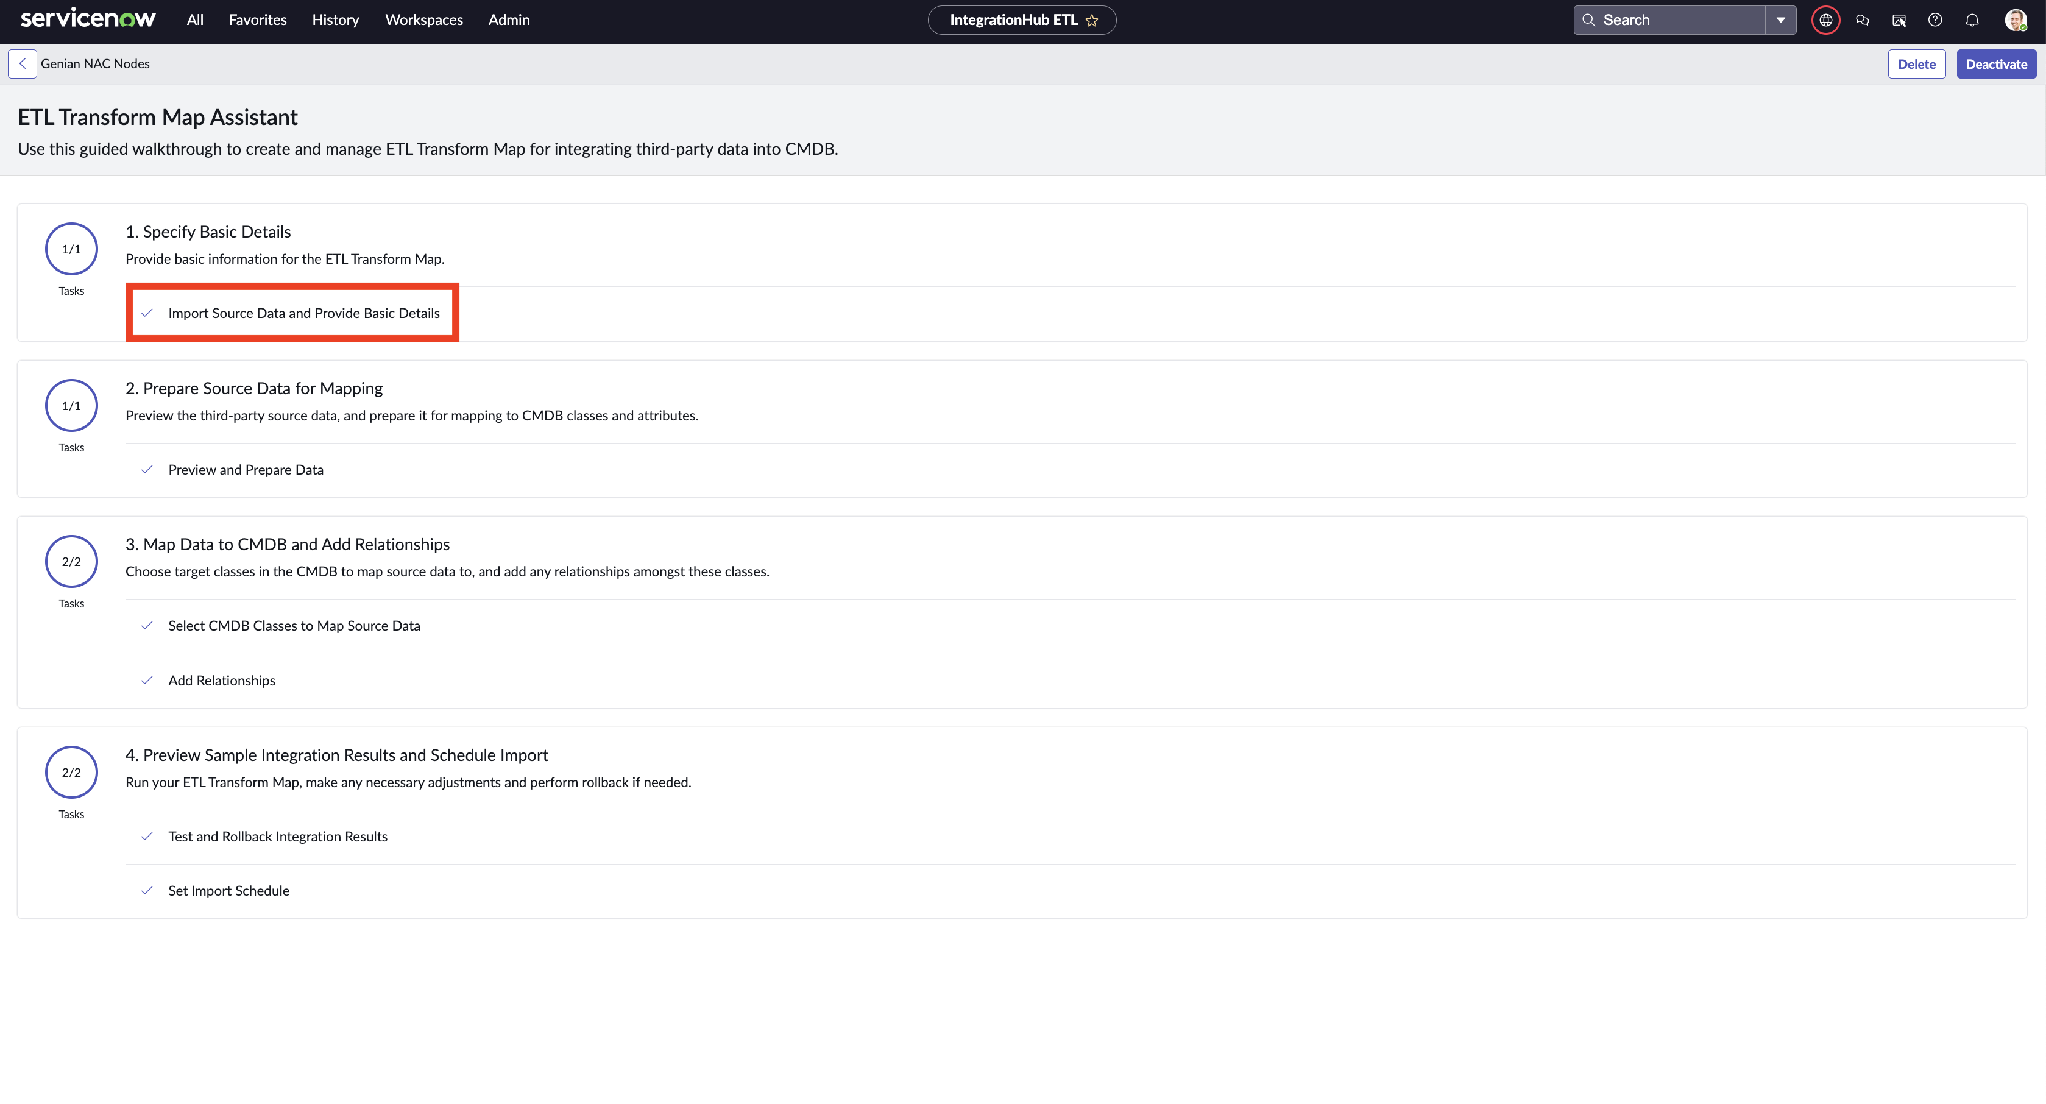
Step 2: ETL Transform Map Assistant screen
Step |
Action |
|---|---|
|
Select the most recent sample data (Sample Import Set) and click Save |
|
Review the imported columns and values |
|
Review class mappings and relationships between CIs (unnecessary fields may be excluded or additional fields may be added) |
|
Check the test results with Run Integration, then remove the test data with Perform Rollback |
Under Set Import Schedule > Set Schedules, configure the following settings and click Update. To run the import immediately, click Execute Now.
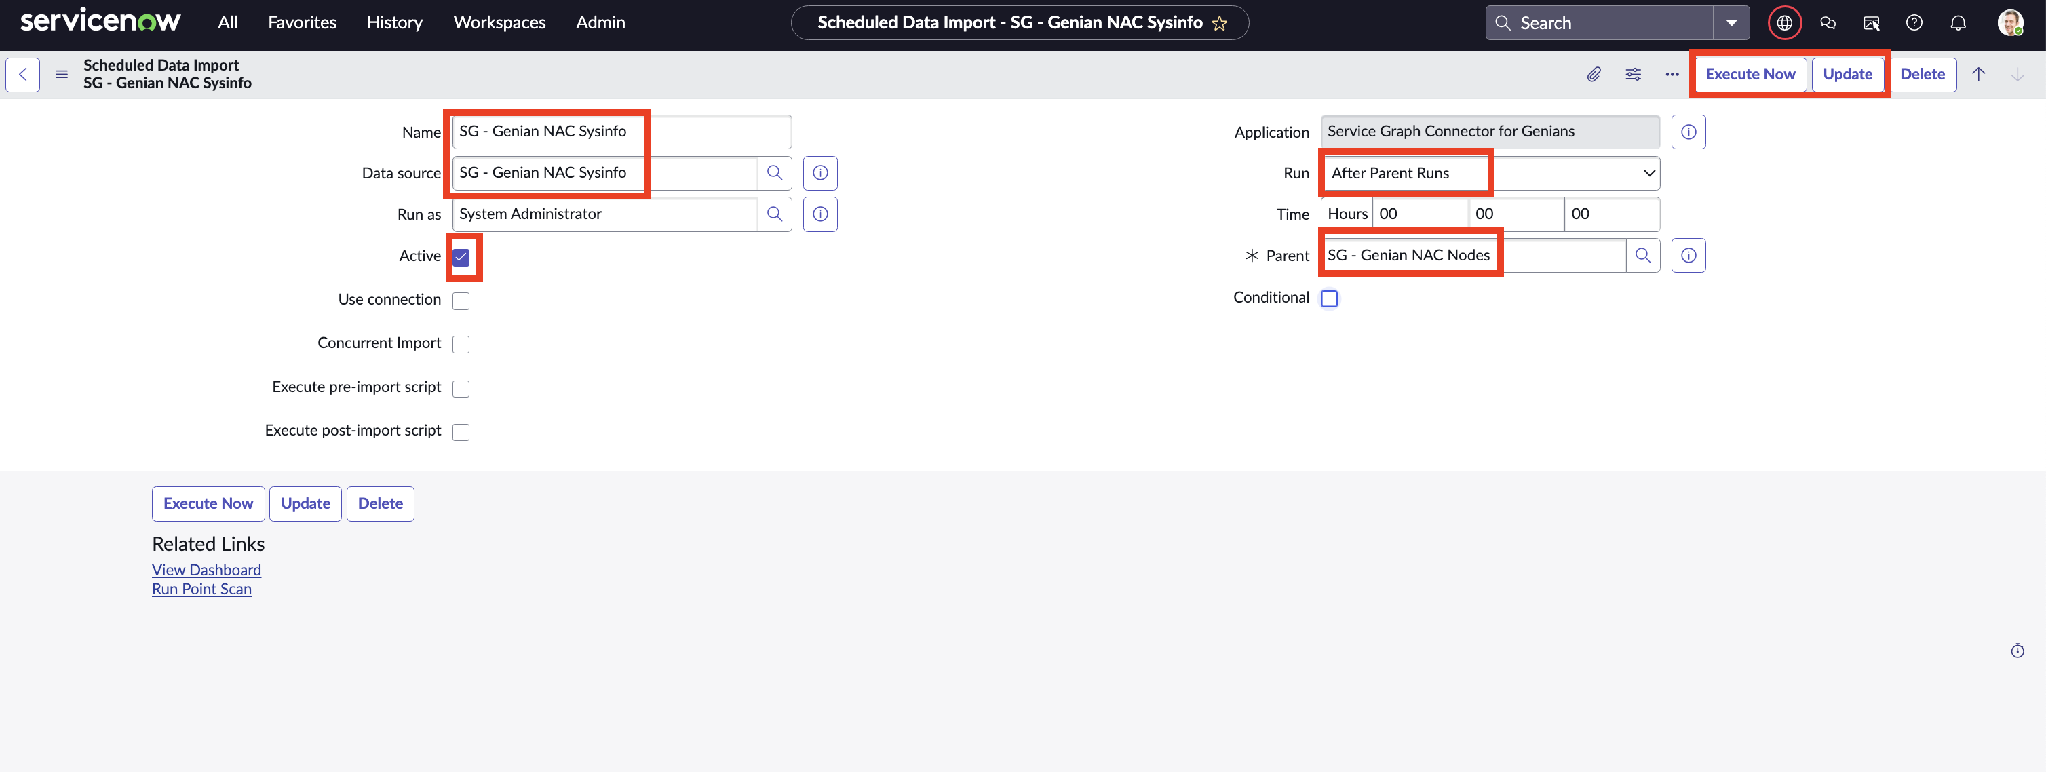
Step 3: Set Schedules screen
Schedule |
Configuration |
|---|---|
SG - Genian NAC Nodes |
Select Active and specify the frequency and time under Run/Time (e.g., daily) |
SG - Genian NAC Sysinfo |
Select Active; set Run to After Parent Runs (runs after node information is collected) and Parent to SG - Genian NAC Nodes |
Repeat steps 1–2 under Configure the Data Mapping and Schedule Import for Sysinfo.
Verify Integration Results
Step 1: Verify the CI List
Navigate to Service Graph Connectors > Genians > Genian NAC CIs and verify that NAC nodes have been registered as CIs.
Verify that the class, operational status, IP address, MAC address, and name match the node information in NAC.
Step 2: Verify CI Details
Select a CI and verify that information such as OS, manufacturer, model, memory, and disk capacity has been populated.
In the Network Adapters and CI IPs tabs at the bottom, review the linked network adapter CIs and IP address CIs.