Configuring DHCP Server
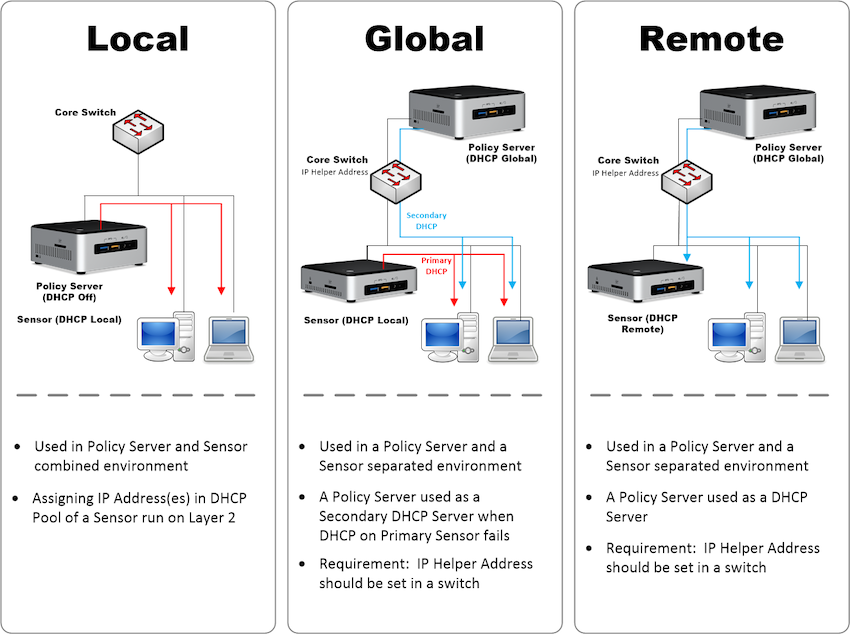
The Dynamic Host Configuration Protocol (DHCP) is a standardized network protocol used on IP networks. The DHCP is controlled by the Policy Server/Sensor that dynamically distributes network configuration parameters, such as IP addresses. You will be able to configure and manage the Built-In DHCP Options and configure Policy Server/Sensor to utilize the three DHCP Services. (Local, Remote, and Local & Remote)
Topics |
Description |
etc |
|---|---|---|
Local |
Provides DHCP service for the network sensor's management scope |
|
Remote |
The network sensor does not provide DHCP services. the remote server provides DHCP services. |
Switch requires DHCP Helper Address setting |
Local & Remote |
Provides DHCP service to the network sensor's management scope and Local IP band for remote network sensors |
Switches with DHCP Snooping or DAI
When the Network Sensor or Policy Server provides DHCP service (Local or Local & Remote) and the switch the sensor connects to uses the following security features, configure the port connected to the sensor as a trusted port.
Switch Feature |
If the Sensor Port Is Not Trusted |
|---|---|
DHCP Snooping |
The switch drops DHCP server replies (OFFER, ACK) that arrive on untrusted ports, so endpoints cannot obtain an IP address. |
DAI (Dynamic ARP Inspection) |
The switch drops ARP packets that do not match the DHCP Snooping bindings. DHCP replies are not affected, but the sensor's ARP packets are dropped, so ARP Enforcement may not work. |
The following example configures the port connected to the sensor (Gi1/0/1) as a trusted port on a Cisco switch.
Switch> enable
Switch# configure terminal
Switch(config)# interface gi1/0/1
Switch(config-if)# ip dhcp snooping trust
Switch(config-if)# ip arp inspection trust
Switches from other vendors provide an equivalent trusted port setting. Commands differ by vendor and software version, so refer to the vendor's documentation.
Note
Apply the trusted port setting only to the port connected to the sensor. If you trust a port connected to endpoints, the switch no longer protects that port against rogue DHCP servers and ARP spoofing.
To Configure DHCP Services To Network Sensor In Operation
Go to System in the top panel
Go to System > Sensor in the left System Management panel
Find and click IP/Name of Network Sensor
Find and click Settings tab
Click Sensor Settings
Find DHCP section and select On in DHCP Service
Based off of your network environment, choose one of the Service Target below
Find Node IP Pool section and reserve an IP range of IP Addresses (e.g.192.168.10.2-100)
Find Lease Duration and define when an IP expires (Minutes, Hours, Days, or Months)
All other settings are optional:
DNS Server
Domain Name
WINS Server
NTP Server
Sensor IP Pool
IP Assignment-Prevention Target
DHCP Option
Static DHCP
Click Update
DHCP service only on policy server
This section is used in a remote environment in which the network environment is a DHCP environment, the principal policy Server is a DHCP server, and the network sensor is a remote operating environment.
Go to System in the top panel
On the right screen, click the IP of the policy server.
On the Sensors tab, click Sensor Settings.
In the DHCP entry, set it as follows:
DHCP Service: On
Service Target: Local & Remote
Node IP Pool: Remote DHCP Set Network Sensor IP Scope
Set other custom settings as well.
Go to the left panel System > System Defaults > Network Sensor.
On the sensor setup screen, set it as below.
DHCP Service: On
Service Target: Remote
The current sensor does not provide DHCP server functionality, but provides DHCP services from other servers.
Click Update